Mark Making
Mindmap
Mindmap
Exercise 4
Task 1
Observational Recording using Primary Sources
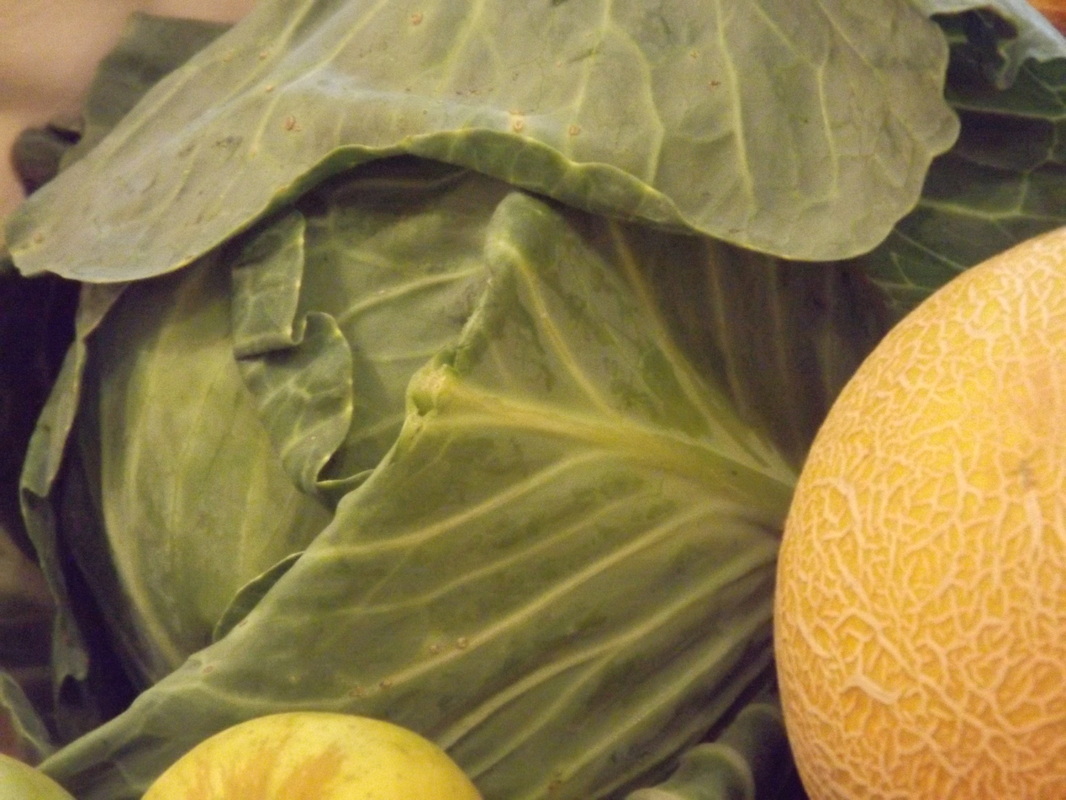
In this first task of exercise 4 I will be looking at textures and portraying items in other media, I have started of by using some fruit & veg and photographed them at different angels and zoomed in to see textures of said items I made images of these in colour & black & white. I then took the image of the cabbage, melon & apple first I done a sketch of this and then added some texture to this on a larger scale using cornflakes for the melon and the rest was done with clay.
Task 1
Observational Recording using Primary Sources
In this first task of exercise 4 I will be looking at textures and portraying items in other media, I have started of by using some fruit & veg and photographed them at different angels and zoomed in to see textures of said items I made images of these in colour & black & white. I then took the image of the cabbage, melon & apple first I done a sketch of this and then added some texture to this on a larger scale using cornflakes for the melon and the rest was done with clay.
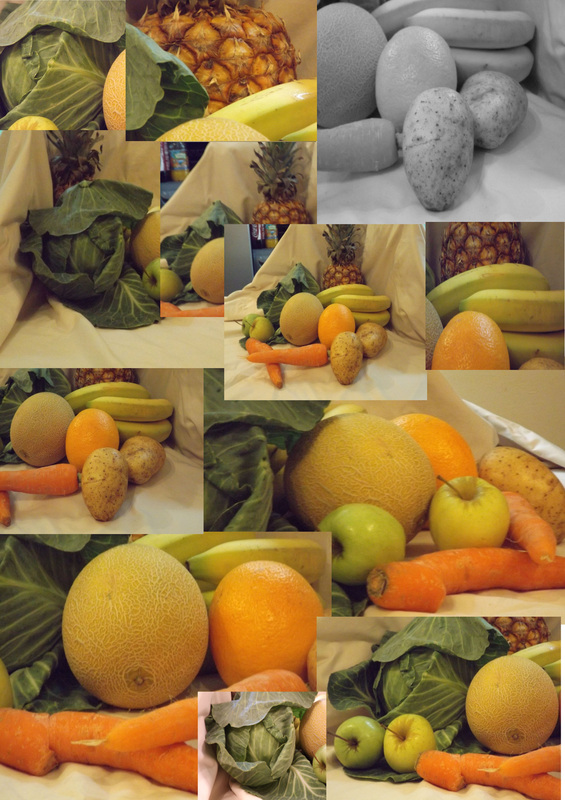

This is a photograph that I took, zoomed into it to get the cabbage as the main image. I am using this as there are quite a few different textures in the image, there is also light & shadow that gives the image depth. I have tried to portray this in my sketch, tried to get the different layers of the cabbage leaves & the veins in it as well. The melon to the right of image has a different texture, like a crackled effect. This looks like a dried river bed for example, or like crazy paving. You may not see this in the small image on the left so I have a larger one below. I find it hard to portray texture in a sketch, I have tried to do this with the image that I applied clay in different colours & used breakfast cereal for the melon then painted it. This gives my work texture and shape.
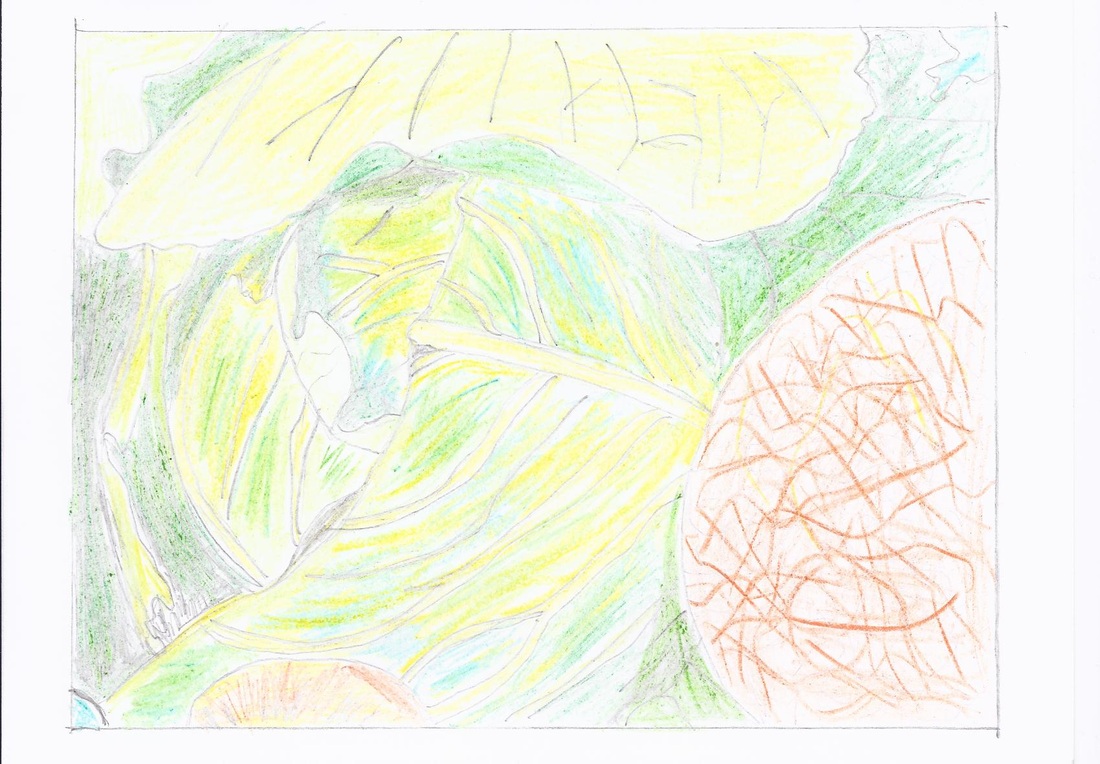

When that I used the clay for this artwork, I had never worked with this material before and found that I could not get the veins of the cabbage as fine as I wanted. The clay was all different colours to try to make a layer effect, then I even mixed the clay colours for some other parts of the artwork. If I was using clay for future artwork I would experiment different ways to use it first, the way that you handle the clay can change the texture and effect of finished work. I personally would have liked to get the finer detail of the cabbage veins better, But as this was a first attempt at this I can see this in my artwork.
Clay is a very good material to work with and I hope to use it to better effect in future projects.
Clay is a very good material to work with and I hope to use it to better effect in future projects.
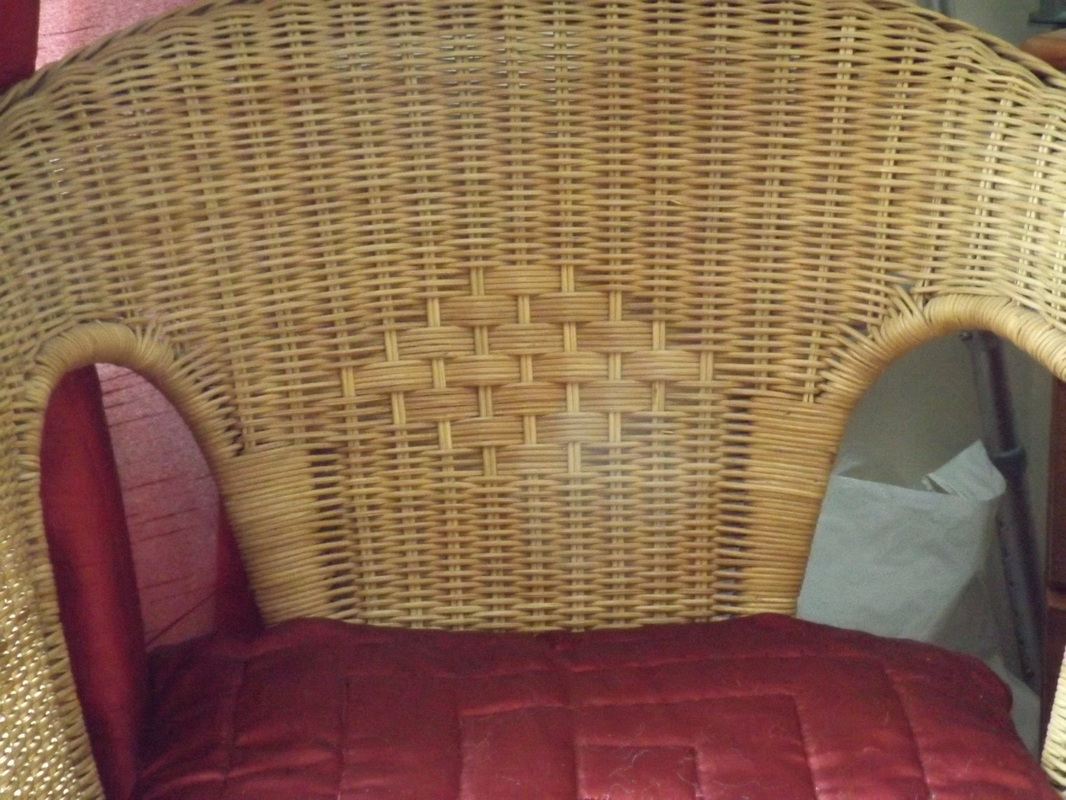
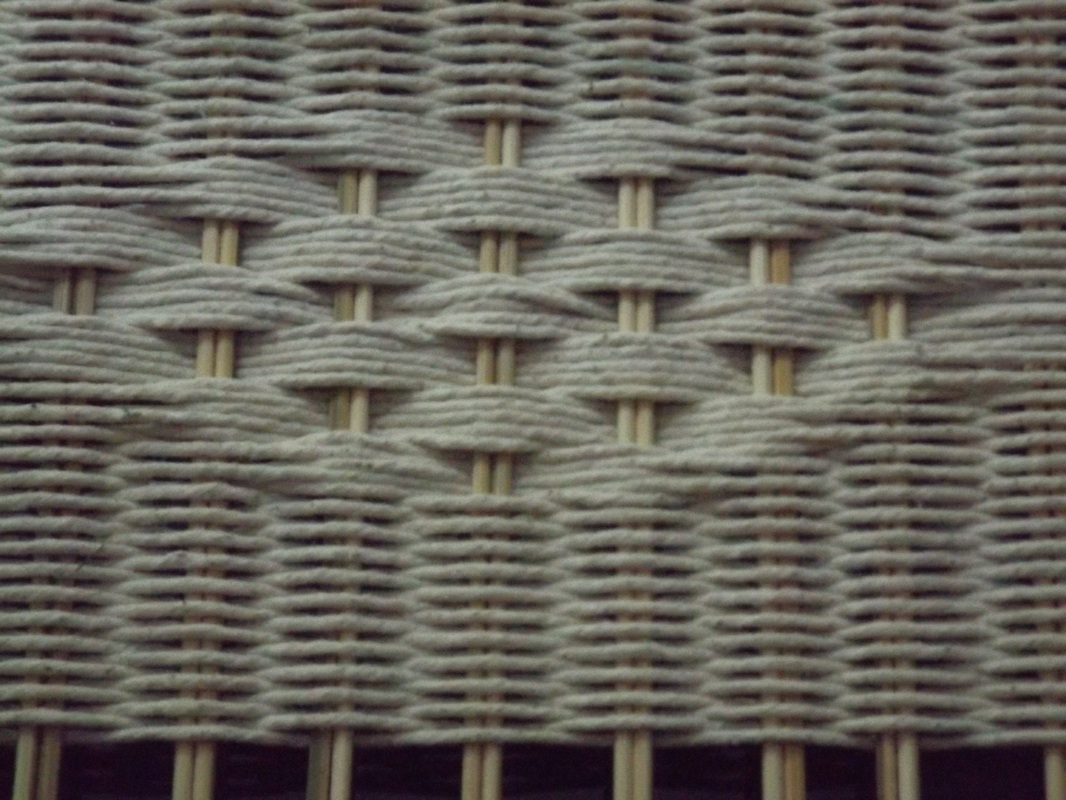
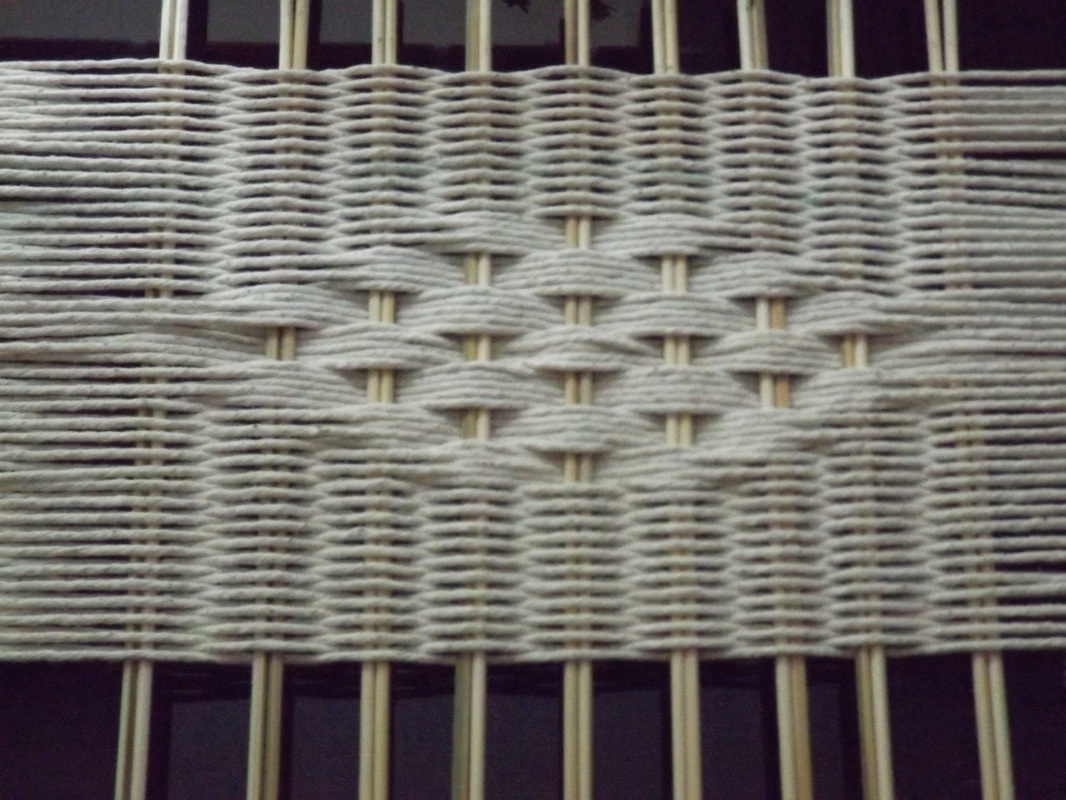
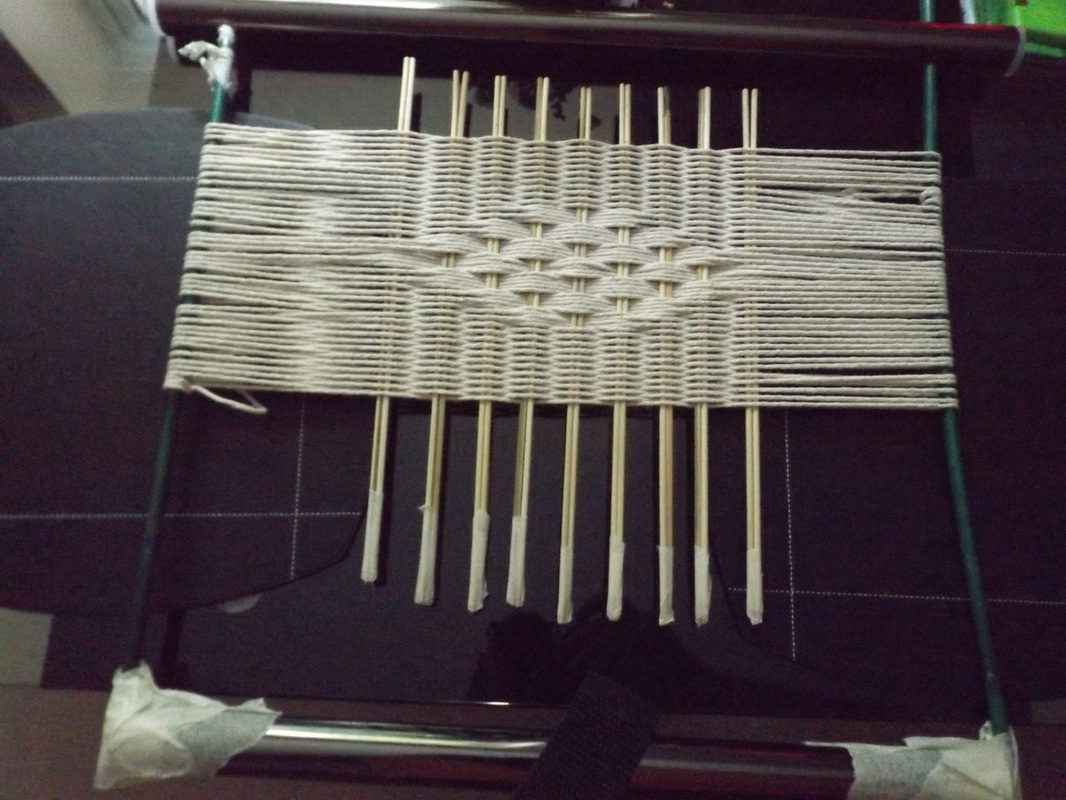
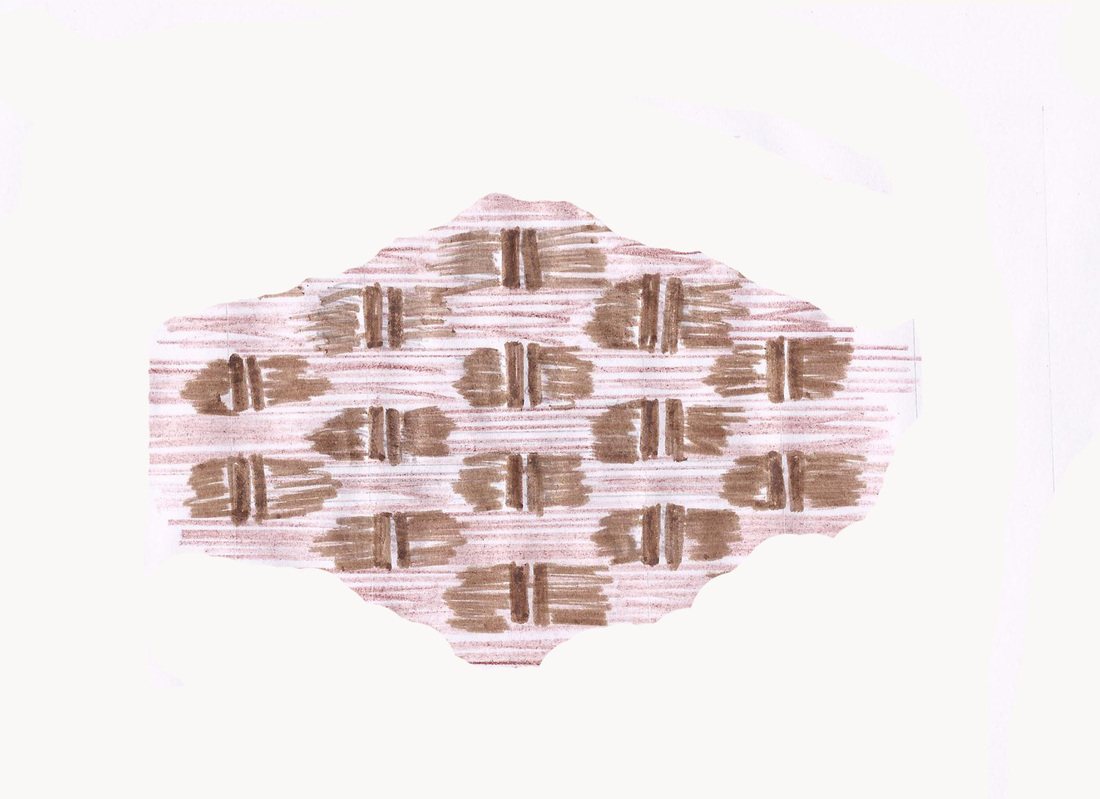
Above and the & images below you can see the pattern that I created of the back of my wicker chair, firstly I made a frame / Loom out of bamboo garden cane & some pipe I had lying around. I done the weaving with string & bamboo BBQ skewers for the down piece, this is the first time that I have ever attempted weaving and think that the pattern has come out well. I found this quite easy once that I had a study of the pattern, the string & BBQ skewers were easy to work with the only problem that I encountered was that some of it was tighter than others. This was due to me wrapping the string to tight and the bamboo cane bending , I re worked some of the work as it was to slack.

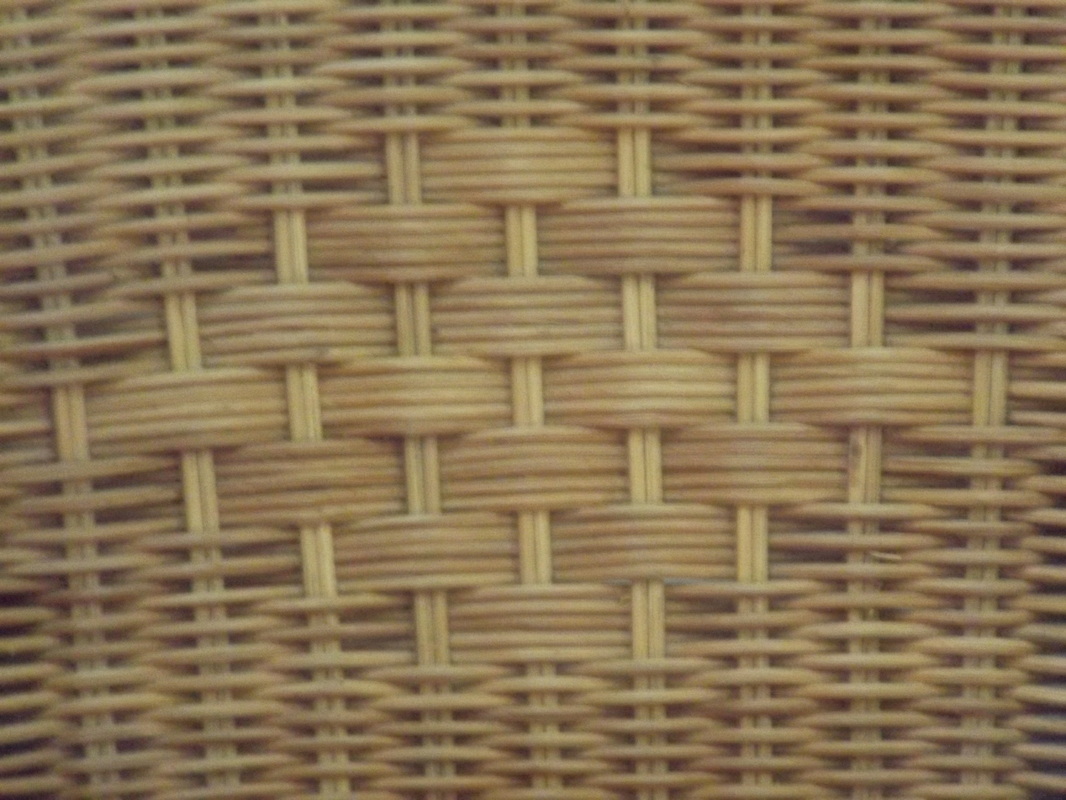
This is a sketch of the centre part of the wicker chair, using colour pencil & felt tip pen. |
|
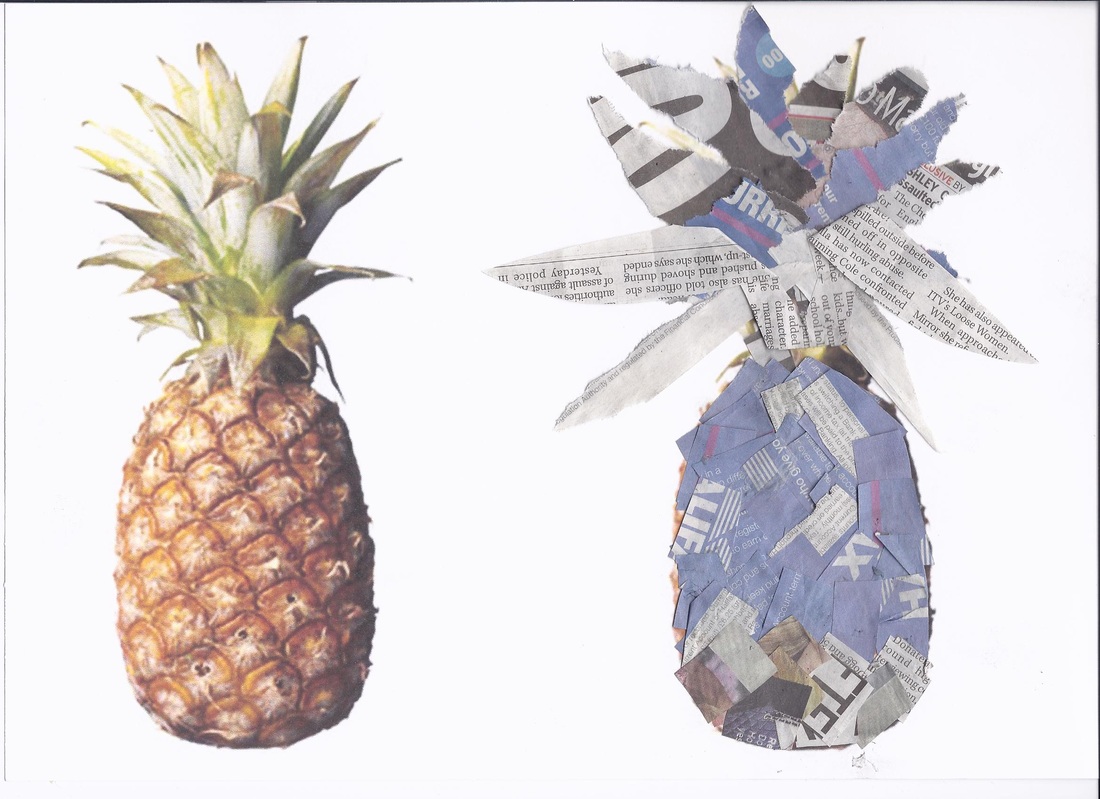
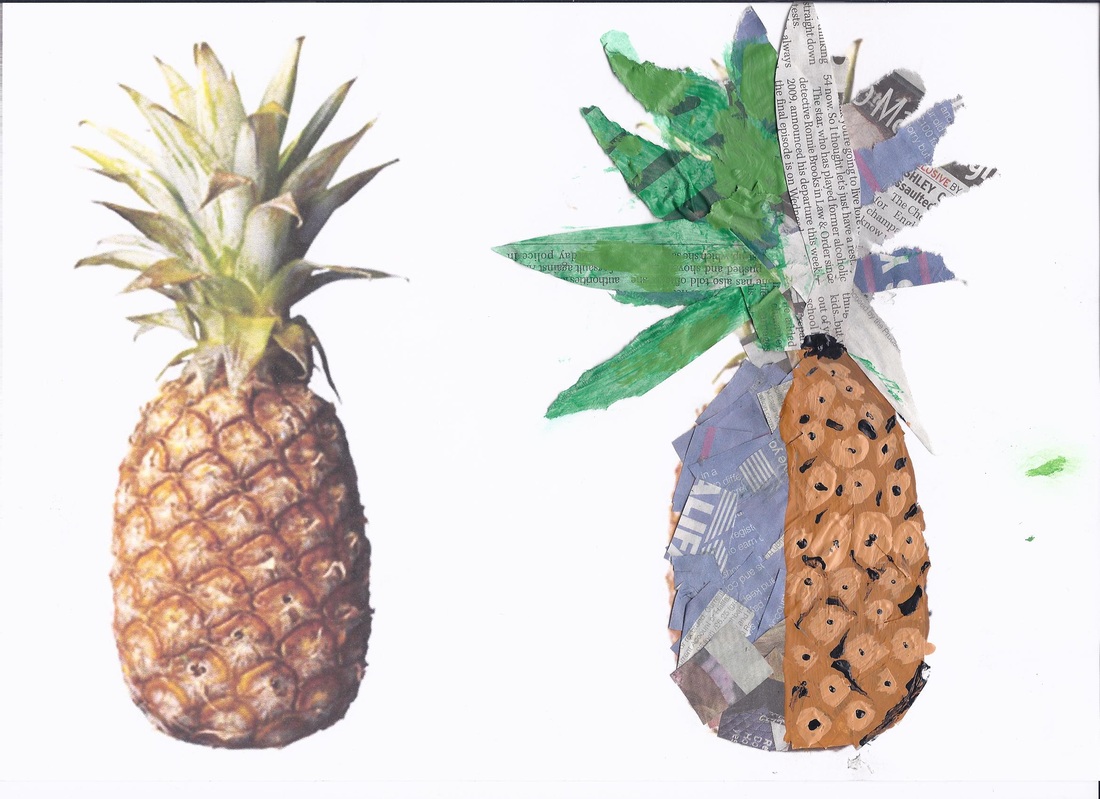
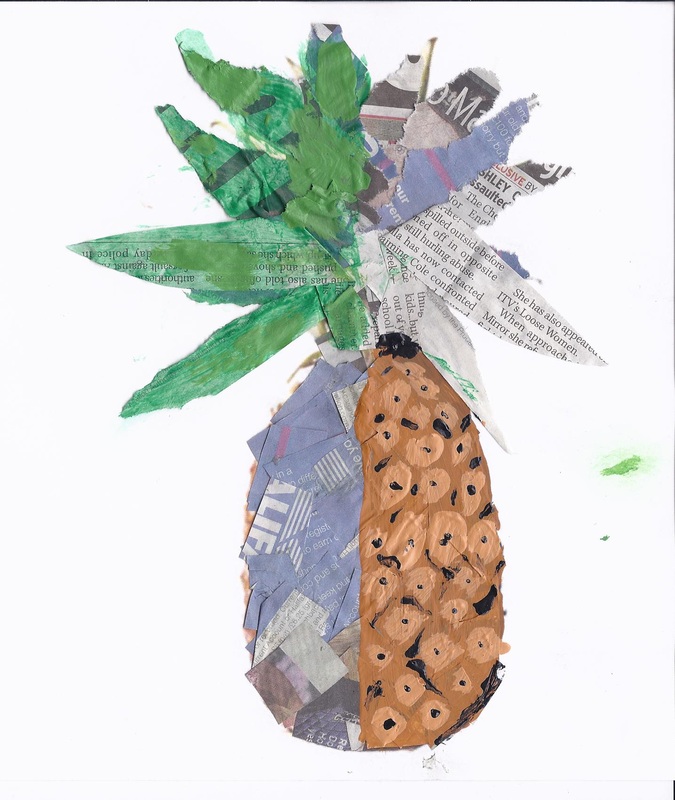
Above you will see a pineapple that I made from news paper cuttings, I am going to paint half of it and leave half as it is to show how i created the texture.

This is the image of a pineapple that I created using newspapers that I torn for the leaves and cut to create the skin effect of the pineapple. I used acrylic paints to bring half of it to life, I think that this has come out well more so in my artwork than this which is a scan of said work. The un - painted side gives me the pineapple skin texture and I think the painted side brings this to life. The leaves look flat in the scan but are not, as only glued down on one end so this gives it a 3D look in my artwork.
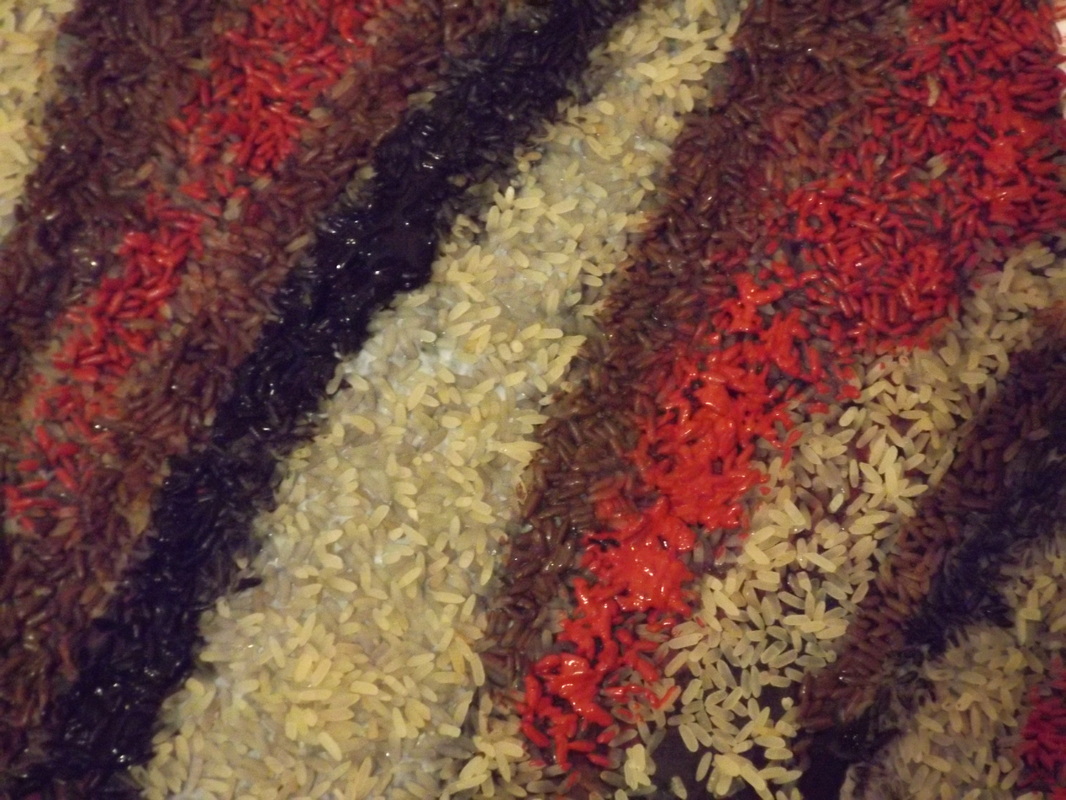
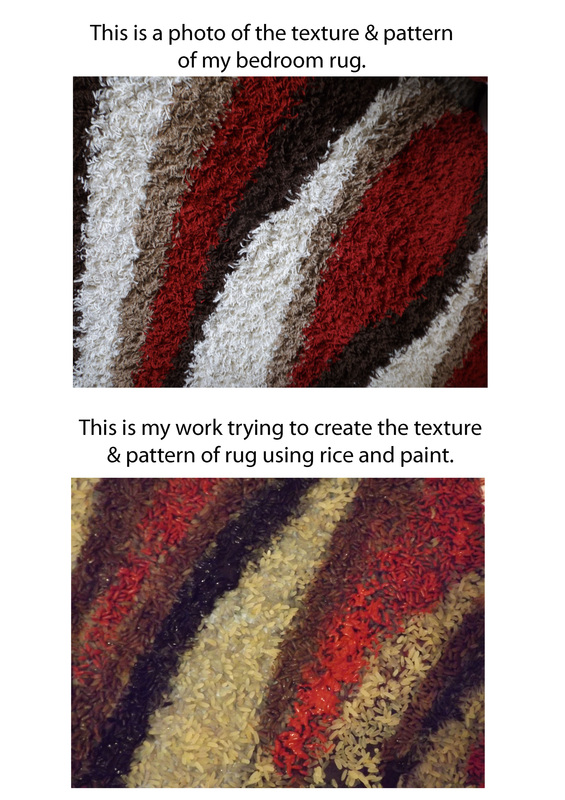
Below you can see a section of a rug I have, to recreate the texture & colour.
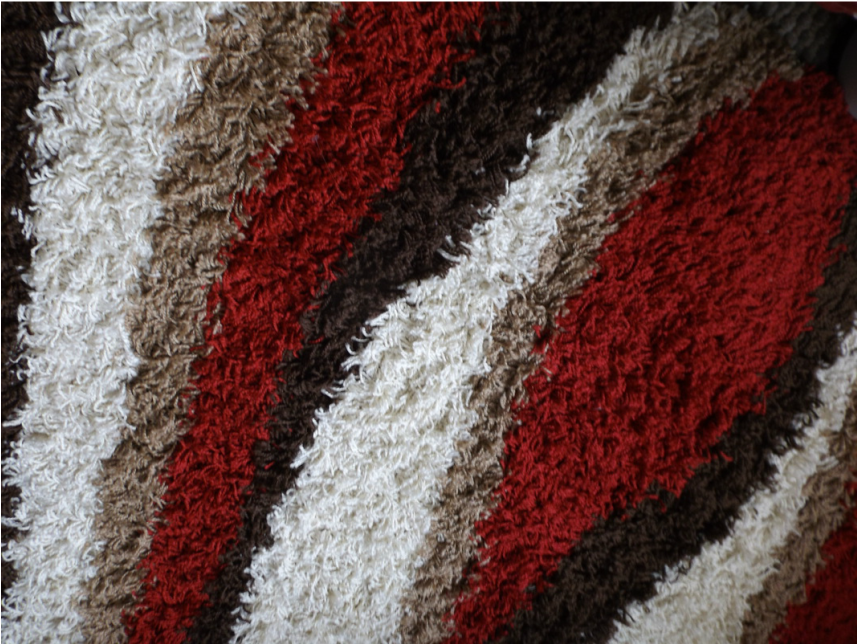
The image below is of my own work to recreate the texture & colour of the rug.
I used rice glued onto the card, this took over a week to dry, then I painted it.
I used rice glued onto the card, this took over a week to dry, then I painted it.

|
The two images here show the materials that I used to create the section of the rug, Rice, Glue & different colours of paint.
|

|
Experimenting with Materials & techniques.
In this exercise I have been looking at different things in different ways, and seeing how that I can portray them in different media. I have done a few examples of this, each one in different form. I have done pencil sketches, pastel colour sketches and done some painting. All of the previously mentioned are different, and show different forms of mark making. I have done perspective sketches in different ways, to show different aspects.
I then moved on to create textures of a few items using a range of items to create the textures. Firstly I got some fruit & veg and arranged it so that I could photograph it from different angels, and zoomed in on to some sections of it so I could see the texture of them better. I made copies of this in black & white and colour, then I sketched a section of the display with a cabbage as the main interest. I coloured this in with crayons then got my self some modelling clay and along with breakfast cereal I turned it into a collage with different textures. This is material that I have never used before and after a few attempts I got the effect that I was looking for. All the materials used in this were readily available to me, and were easy to work with. The clay I would have liked more time to experiment with and create finer lines.
The next texture that I recreated was that of a wicker chair that I have. I once again photographed it and done both black & white images of it, then I sketched it. I thought long and hard how to create the texture of this, and hatched a plan to make a loom and do some weaving. The loom that I made was from garden canes and an old curtain pole I had hanging around, I used wooden BBQ skewers as the down pieces and done the weaving with string. I found this very relaxing, I just followed the pattern from the photo and the out come is very good I think. The items used were items that I had lying around the house, I had to redo the weaving as I was going tighter as I went up the loom so had to undo a section and tighten it up. Otherwise this went well.
This next texture was of a pineapple, I downloaded an image of a pineapple then thought of how I could create the texture of the skin & leaves. I came up with the idea of using scraps of newspaper, I ripped it into small squares for the skin and shredded it into leaf shapes for leaves. The leaves I only glued down on one end to create a 3D effect while I also tried to leave a section of the squares for the skin prominent, I think this worked till I painted half of it then while paint was wet they started to stick together. Once again all the items used were readily available to me from home, and were easy to work with. This process has got the texture I was looking for and with only painting half of it shows it in two different ways.
This next texture of a section of my rug has come out the best of all I think. I was thinking for some time of what to use for this texture, I thought of cutting small lengths of string, using spaghetti in some way, Then I thought of rice. I had a bag of rice at home and some glue, to get the rice to stick to my card I had to use a lot of glue. It took over a week to dry, when it was dry I painted it in the colours of the rug except for the white as this looked ok as it was. The materials in this texture were easy to use, except for length of time glue took to dry. When that you put the image of the rice collage next to a photo of the rug this one has turned out most realistic.
In this exercise I have tried out different media, I have used many different materials, and used different scale and form of items. I have used techniques from precise, cleanly outlined drawing / cutting methods to looser or torn techniques. There is a 3D effect in some of my examples, I have changed my photographic images from colour to black & white and used different angels and zoom settings. I think that I have shown that I can produce a series of different studies showing that I can develop ideas. I think that I am getting to grips with all different types of media now and the more that I use these the more control that I will have. All my work has been photographed and is put into my weebly web page as a record of work produced and originals are given to my tutors.
All in all this has been a very rewarding exercise, I have been using techniques that I have not used since school if at all. I have used materials that I would not think of using before and I am pleased with the outcome of my work. I am now looking at things around me and thinking how can I portray them in a different media or style.
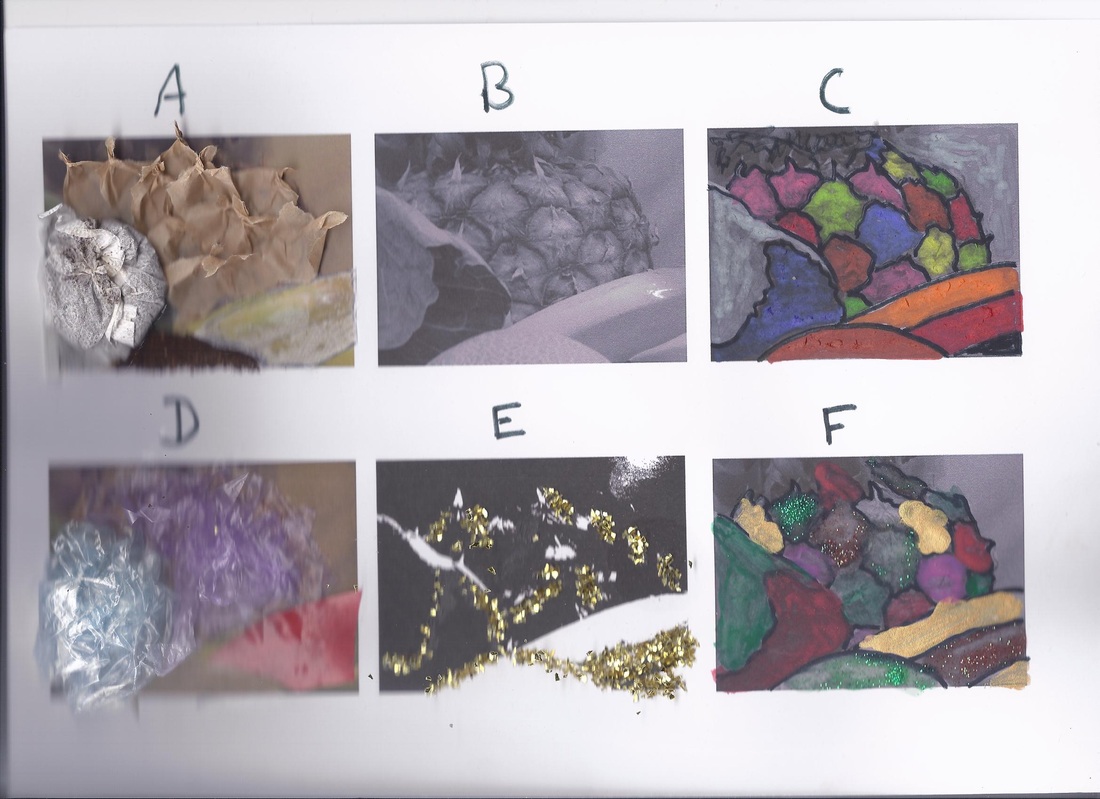
Taking a picture on a journey of visual explorations

I used this image from an earlier task, I had taken the photograph myself. I wanted to portray the image using different media/materials that were easy to sauce from around my home. I firstly laid six images out in photoshop and converted one to black & white and one to threshold. I had been looking for different materials to do each one and came up with :- tea bags, Plastic bags, Grease proof paper, Glue, Felt tips, Paints & glitter.
My Pineapple Texture
Exercise
Exercise
A.This texture was created mainly with a teabag, I glued a teabag into the bottom left-hand corner and scrunched it up using glue to try to keep shape for the cabbage. Then I opened a teabag and used the tea leafs for my melon texture by first applying glue to the melon area and tipping the leafs onto it, The paper of the teabag was used to create the banana texture also fixed with glue. The pineapple texture was created by using grease proof paper ripped into squares and twisted in one corner and overlapped fixing them with glue.
This image was quite easy to do the tea bag was easy to just glue into one corner then I had to put glue on top of it and scrunch it up, which was quite sticky but OK. I had to split a tea bag for the leafs, I put glue on the section that I wanted this texture on and tipped the leafs onto it. the pineapple was done with squares of grease proof paper which were ripped up to give a rough edge then glued on separately, twisting the top corner for effect, very easy to do this.The banana texture was done with the tea bag that I had used the leafs out of cut into shape. I think that this is a good example and looks good in this form.
This is an image that could be used in a craft/scrap book shop. This would show how that you can use everyday items for mark making.
B.This image is a Black & white one that was manipulated in photoshop, this is digital mark making and shows the photo in a different perspective to the original.
This image was done using photoshop software, I opened my image in photoshop went to Image in the top bar > Adjustments then scrolled down to Black & White. This I find very easy as I have worked with this software for some years now. This process gives the image a nice vintage look and it cane out well. Very easy to do.
This image gives a vintage look & could be used in a black & white Victorian poster maybe. Or a retro 40's style back drop in a traditional greengrocers shop. This image would also work in a book for old fashioned recipes.
C.This image was done using felt tip pens. I used a black pen to do an outline then I used vibrant colours that you would not associate with the fruit & veg in the image.
I think that this image is self explanatory, felt tip pens were used to colour in a Black & White image I used a black one to create outlines and just picked contrasting colours to fill in. This looks very good I think.
This image would be good as a poster for an art lesson in a school, showing abstract fruit & veg.It could also be a backdrop for a farmers market, fruit & veg market.
D.This image I created the texture of the fruit & veg by using different colour plastic bags. I used blue for the cabbage scrunched up and glued in place. The pineapple texture was created with a purple plastic bag, shredded and layered into place with glue. The banana texture was done with a red plastic bag. Finally I used some grease proof paper for the section of melon.
This image is my least favorite, it looks messy in parts but good in others. The blue plastic bag in bottom left corner could have been done better and I would shred it if I was to repeat this image. The other plastic used for pineapple & banana was easy to use as I had cut it into smaller pieces. This image has come out the worst in my opinion.
This image has been done from scrap plastic bags so could be used in a recycling environment to show different ways to use your waste.
This would also work for local councils for their recycling posters, recycle plastics & food (fruit & veg).
E.This image was manipulated in photoshop once again, this time I turned it in to threshold, this takes away most of the detail. You can use a slider to add more or takeaway the detail to your required level. I then added detail with different colours of glitter glued onto required sections.
Once again I used photoshop for this image, I followed the same steps as in image B but this time instead of Black & White I chose Threshold. With this you can use a slider to give your image as much or as little detail as you want. Glitter added to create detail. This is easy to do and you can get great effects.
This image is very dark and sinister, it could be used in conjunction with other dark Gothic style images for advertising. This could also be used in advertising a scary event Halloween for example.
F.This last image I have used a felt tip pen to get my outlines. Then I used glitter acrylic paint to colour each item of fruit & veg.
This last image was also easy to do, I once again done my outlines with a marker pen & painted glitter paint in section repeating some of the colours. This was very easy to use the materials. I think that the glitter effect in the paint looks good.
This image has a glittery, sparkly look and could be used for a craft magazine feature showing the use of the type of paint. This could also be used in a fashion magazine or a backdrop for a photo shoot. And would make an abstract fruit printing pattern
Each of the above images could be used in more than one way be it :- a pineapple article in a magazine, an organic farm shop advertising, for a poster for a compost recycling site to mention a few.
I think that each of these images has its own characteristic, and all are different. C & F are similar one being done in felt tips with the other in glitter paint, you can not see much difference in the image above but entirely different in actual art work. A & D look better in the original artwork as they have a 3D effect to them but once again they are different. I have not done this purposefully but each lower image has a resemblance to one above. perhaps I should have mixed them up more.
I think that all images have come out very well all using different techniques. All the materials that I used I had from previous assignments except for the glitter which I borrowed from my granddaughter.
I took the photograph of the fruit & veg, then was inspired to look through my house to find materials for this task. I did look at other things such as pasta & rice, but as you would have seen from previous task I had used these so decided on tea bags, Plastics, Grease proof paper, felt tips, Glitter paint & glitter plus the glue to hold it all together. I would work with all these materials again and I have enjoyed this task and it's out comes.